Heat is probably the answer for wheel wells. Using an accetelyne torch, simply keep it moving back and forth and the materials loosens an comes off easily with wire wheels or brushes. Do not get the metal too hot, you dont want to distort it. Wear protective gear to prevent burns from hot tar.
Brake fluid (pre synthetic),causes the softening too.
Floorpans and flat areas can be done with dry ice (if it's available). Lay it on the inside floor, cover it with something insulating and twenty minutes later the undercoat just chips off. Just bump the underside and watch it fall off in chunks.
If you plan on polishing them on a buffing wheel, all I can say is be carefull. (yes I learned this the hard way) I found a really nice set and paid top dollar, only to see one of them spinning around my buffing wheel at 10,000 RPM's. When buffing, only go straight up and down and polish a small area at a time holding as tight as you can. Be careful, at the speed the wheel is turning it's easy to lose a finger or more, if it grabs the piece. Some things are best left to the pros. BR[]
2) When I remove the drip rails, I always use the bottle cap end of an old style can opener. Put a rag between the opener and the drip rail and pry it off from the bottom. Roger Green
FUBAR
Freeing A Siezed Engine:
This is one I never heard before. If you have an engine that is seized and won't turn over. Buy 2 cans of Coke, Pull the spark plugs, then using a transmission funnel, pour 1 can of Coke equally into 4 cylinders on one bank and repeat on the other bank. ( I'm not sure if you use Diet Coke on small blocks or not) Let the coke remain in the cylinder for at least one day and then using a breaker bar with an extension try turning the engine again. You may be surprised. Fast Jack Muenzer (Muenzer Racing)
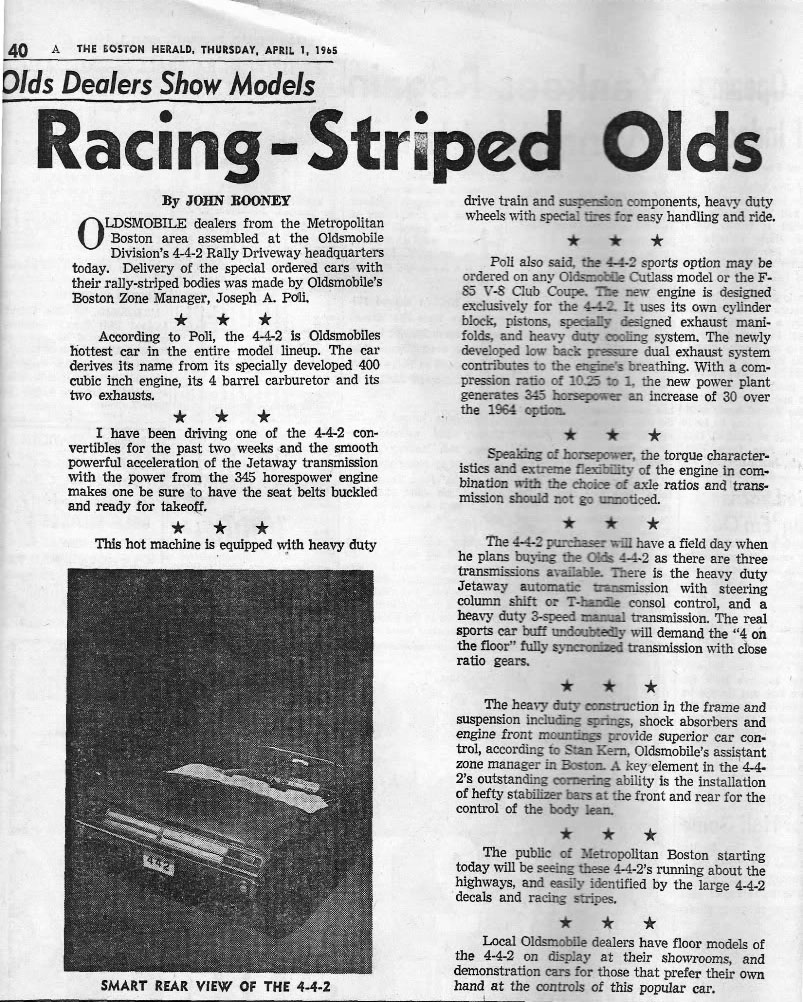
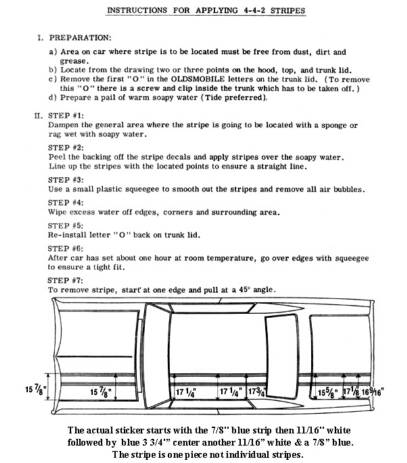
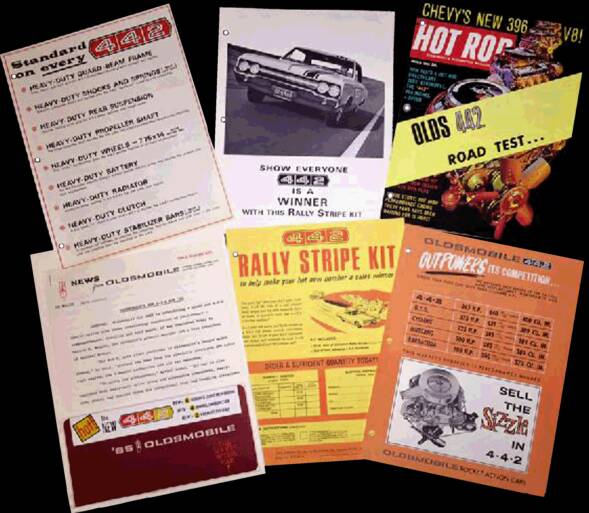
Dealer Installed Stripe (Very Rare Option):
The article shows a Boston Area dealer installation sheet for a single racing stripe that was applied to the left side of the 65 442. As you can see, it runs the entire length from front to rear. Some also had a large 442 sticker on the tail end of the quarter panel. They were used on the 4-4-2 Rally by specific Olds dealers similar to Chevys Baldwin Motors & Yenko. The actual stripe was a solid piece of white vinyl with the color added, creating the illusion of 3 separate stripes, usually black, blue or red, but white was used on black cars. These were a 65-66 dealer accessory items only. (different application instructions) Each kit contained 2 large 442 emblems and the stripe. They could be dealer installed or purchased separately.BR[]
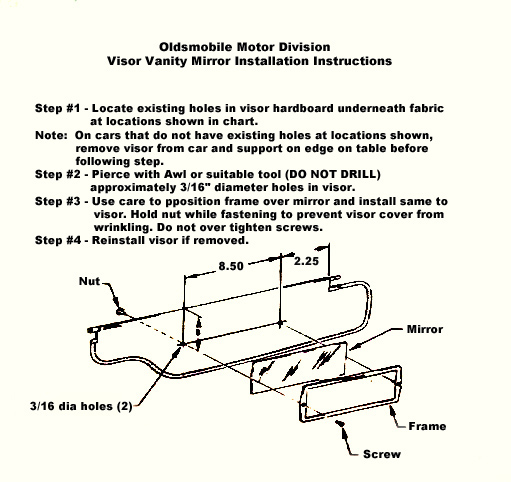
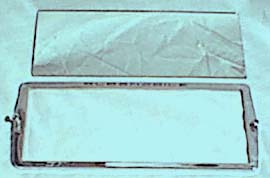
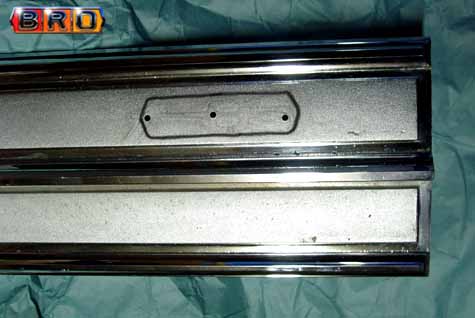
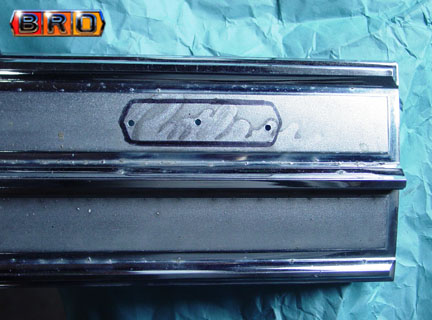
Dealer Installed Vanity Mirror Location:
This is a copy of the dealer installation sheet. BR[]
Header Selections That Work On The 65 442:
Most header manufacturers claim that their headers will fit 65 thru 72 or 76 442's. Very few actually fit the 65 at all. I have found that the Dyno Max 86029 High performance 65 - 76 GM car Ceramic and the BlackJacks fit pretty well. They may need a little tweaking. ( I by no means have tried them all, so if you have any that work, let me know) BR[]
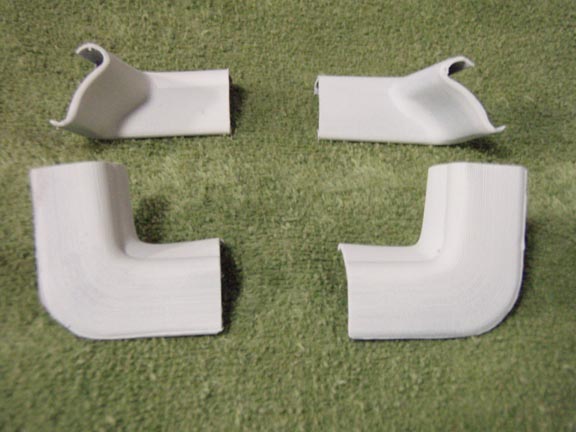
Rear Filler Panel Selections:
As you can see by my pencil marks, the 442 emblem will cover up the F-85 and Cutlass mounting holes, so you can use any panel on your 442. You simply have to drill 2 new holes. It's best to use an old emblem with holes drilled where the mounting studs attached. Center it over the existing holes. Use a felt pen to mark through the holes. This way you can be sure the holes will be covered. BR[]
Dash Plate Restoration:
I have some tips for restoring a dash plate. First strip all the old paint off
and inspect for any pitting. Sand down the pits if possible, and if it is a
chrome 64 piece, sand down the entire piece to rough it up. The 64 is
identical except for the pad above the ignition switch. ( 64's have "on"
and "lock" stamped on the pad where 65's don't) You must fill these with
bondo before moving on to the next step.
Prime the entire piece with a good rattle can primer. Next use Plasti-kote Wheel Paint #618 "steel wheels" to paint the dash piece. This paint is the closest I've found to the Argent Silver Metallic that Olds used. I've tried 4 other paints that were supposed to be close, and this is the closest. Pep Boys sells this brand of paint. Don't forget to paint the radio face.
Next tape off the silver so just the black area is showing. Use Duplicolor Flat Black Enamel # DA1605 to put the flat black back on the dash. Jasen Ramsey
442 Emblem Restoration:
To restore the 442 badge I've found three paints that match exactly. All three are Testors Model Master sprays. The first is called Italian Red # 28109, the next is Hugger Orange # 28108, and the last is Grabber Orange #28105. Use an exacto-knife to cut around the numbers after laying down a piece of masking tape. These paints will make your badge look like new. These are a two part spray system and require a clear coat. Jasen Ramsey
Speedometer & Gas Gauge Needle Restoration:
Also, to put an exclamation point on your work, paint the speedo needle and the gas gage needle using Testors ModelMasters Florescent Red/Orange #2041. The speedo lens comes off with 4 screws and you can carefully paint the needles. Or take off the black cover and do the entire needle. Now you have a perfectly restored dash face. Jasen Ramsey
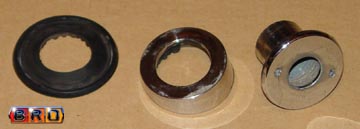
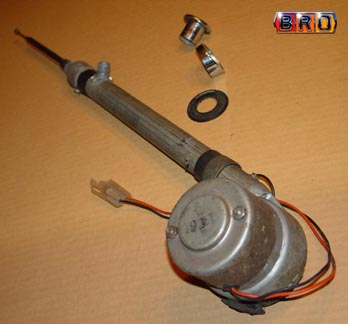
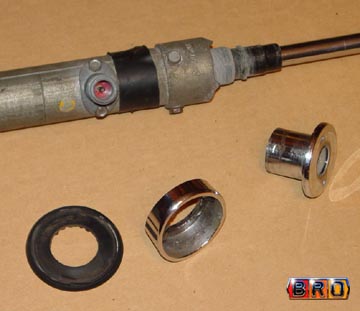
Rear Power Antenna Specs & Location:
This is the correct rear power antenna and mounting hardware for the 1965 442.
The correct casting numbers for the parts are as follows.
1.) The mast (serrated top cap) 302500-112
2.) The mast bracket (clamp) 300500-134
3.) The chrome wedge washer589645
4.) The chrome threaded spanner nut 579837
5.) The rubber gasket has no number
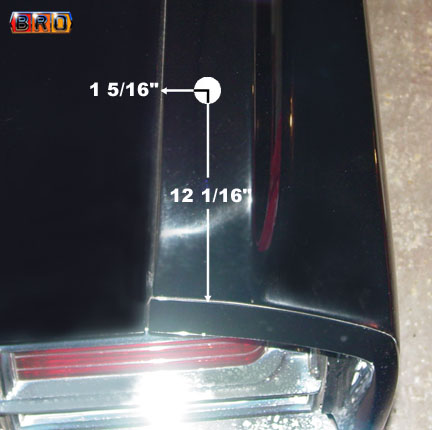
The correct location for the rear power antenna hole is 1 5/16" from the edge of the trunk seal gutter and 12 1/16" from the rear of the fender where it joins the fender tail molding. The diameter of the hole is 7/8". There is also a triangular bracket which attaches the mast to the trunk floor. BR[]
Wedge nut (hollow base) #589645
Top retainer spanner nut #579837
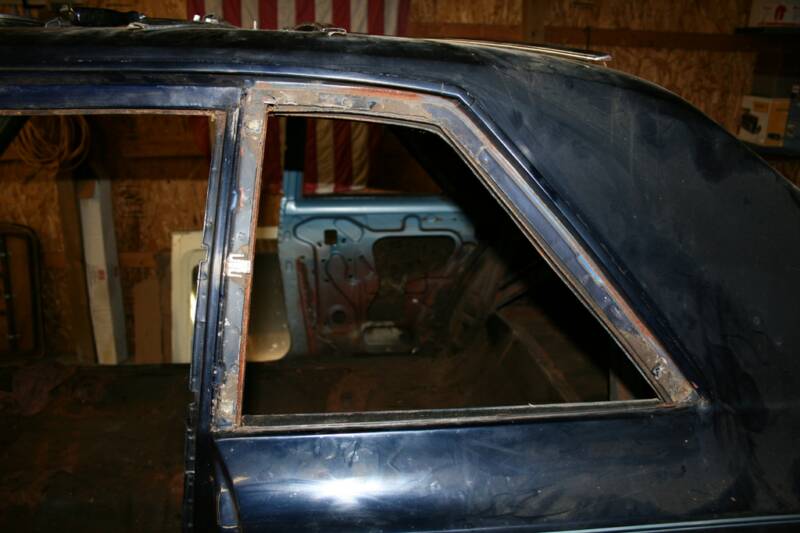
Lower Rear Window Chanel Restoration:
It's been brought to my attention, by Jasen Ramsey, that the lower rear window chanel is available for the 65 Pontiac GTO ( boy that hurts ) and will fit the 65 442. So there's hope for those of you with rusty lower window chanels BR[]
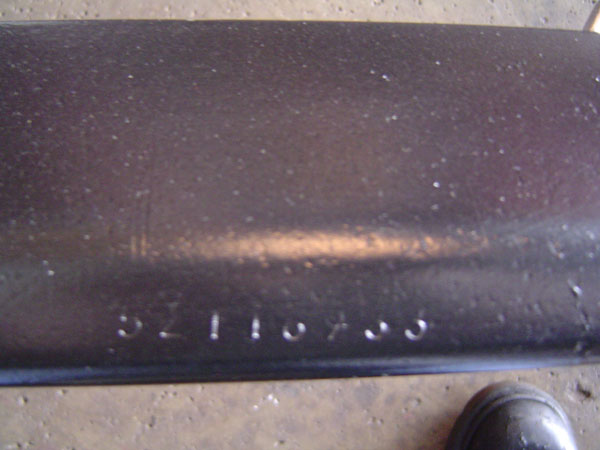
Vin Number Stampings:
In addition to the Vin plate on the front door post you will find the car's vin number stamped into the drivers side of the frame just forward of the center body mount or sometimes further back on the slope before the rear wheel ( on top, not visible unless the body is removed) and also into the side of the 4 speed transmission casing on some, but not all. BR[]
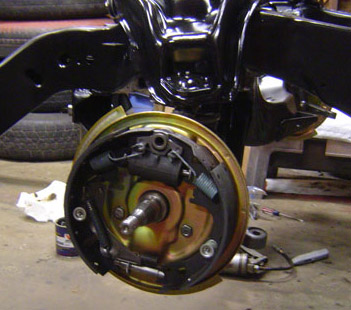
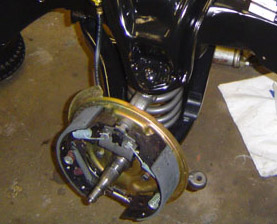
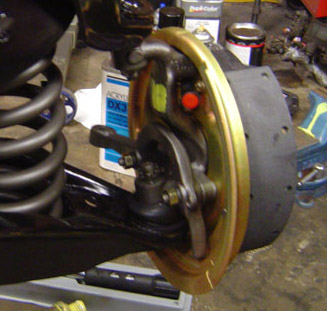
Front Brake Backing Plates:
It turns out that the front backing plates were "cadnium plated" the same as the brake booster. Here is an excellent example. Note the yellow paint dob on picture 3. Jasen Ramsey
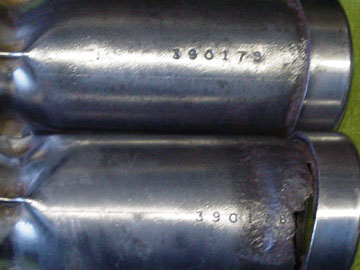
Tailpipe Number Stampings:
I dug out the original tailpipes from my 65 442 Holiday Coupe and (to my surprise) found part numbers stamped at top dead center near the stainless tip. The right side is 390178 and the left side is 390179. BR[]
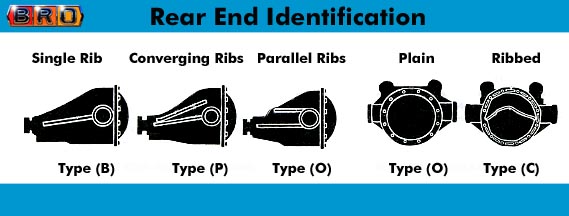
The Oldsmobile 12-bolt has a 12 bolt cover and a 10 bolt gear, which measures 8.3".
Axle shafts are common to the housing used, and due to the usual characteristics like overall length and spline count, the shafts only interchange with the housing that is used. (12 bolt shafts fit other 12-bolts, and 10 bolt shafts fit other 10-bolts.)
Rear spring mounting pads differed, in which 1964 thru 1966 rearends used a flat pad with a hole drilled in the center. 1968 thru 1972 rearends have circular spring mounting pads, which are 3/4" higher than the early flat pad.
1967 was a transition year, in which "A" cars might have a 1964 thru 1966 style rearend, a 1968 thru 1972 rearend (which is wider and commonly available), or a "hybrid" rearend, which will have the 58.5" width, but with the early spring mounting pad and trailing arm brackets.
Rear upper control bushing eyes differ, and the positioning of the bushing eyes will differ. 1968 thru 1972 rearend housings will have a 3/8" forward positioning, which is farther that 1964 thru 1967 rearends.
1964 was the only year that the rearend bushings are small, and any upper trailing arm (from any GM division) will fit 1964 rearend housings. BR[]
Silver Paint For Grill-Dash-Console:
Grill Surround - Dash - Console SILVER
(The original Olds Color was Argent Silver Metallic)
1.) Eastwoods Argent Silver 1001 Z (best match)
2.) Plasti-Kote Steel Wheel is (close)
3.) Premium Rustoleum Metalic 7271
(Silver Metalic) (a little shiney).
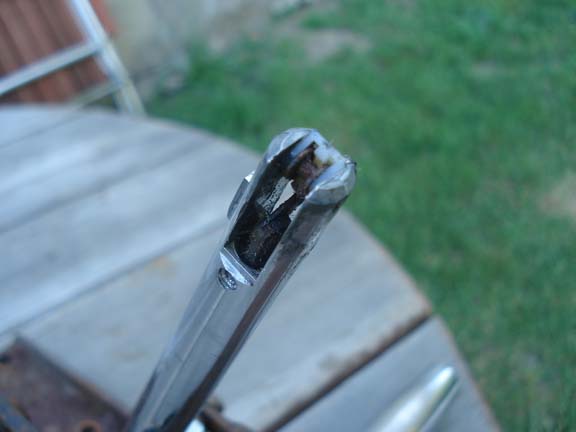
metal and break all the time. You can find them on sale on eBay here and there, but be careful if you bid on one that shows the "T" in place. You need to ask the question, and be aware of some things;
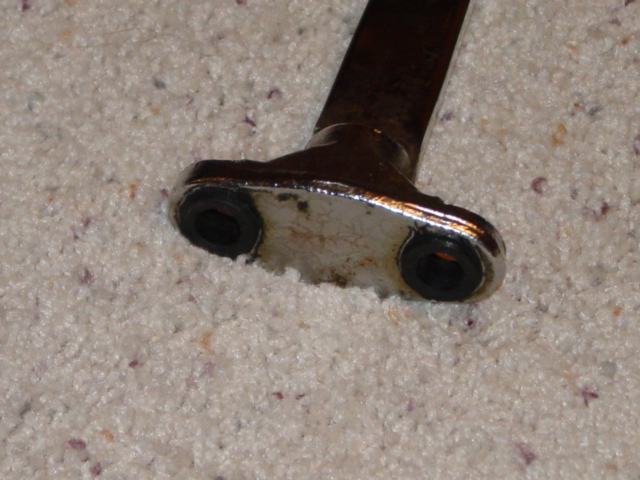
"Is the "T" loose, or does it have any play" - If it is loose, it could mean that one of the ears on the stick is broken, and the "T" is only being held on by one or none f the ears. The "T" should not move and be tight on the stick.
some sellers will be selling a complete shifter with the "T" off and the ears broken and will say; "Needs Work" - Yea, it needs to be fixed, it needs a good stick. Stay away from these. Most likely it is just like the one you already have.
Some sellers will swear that it is in "perfect working condition", just missing the "T" handle. Wrong! The mounting ears are gone and the "T" handle is long since been thrown away. Yes, you can push down on the roller and the shifter will move, but it will not take a "T" handle.
When you do find a good, complete shifter for sale, most likely the seller knows what he or she has and it will be pricey. I've seen good shifters go for over $300 routinely. I saw one go for $575 once with some heavy bidding. They are usually complete shifters with neutral safety switches and the floor boot, but still, that's high.
If you have a broken stick and "T" handle, I'm not sure they can be repaired, even if you have all the parts. Several years ago, something like 15, I tried a few local places to get my broken ears welded back on one of my sticks. No one could or would do the repair. I did find one machine shop that would make me a new stick out of steel and then would have to be sent out to be chromed. The cost was prohibitive so I did not pursue that method. However, I was told by to repair/restoration shops that I checked with that this would be the way to go if there was no aftermarket part available, which there isn't. I do know of a couple of guys that very diligently worked the part and used JB Weld on their stick, but they had all the broken parts. You might try that. A good many folks don't have the broken parts. I have one car with all the broken parts, and I have one car without the "T", just a broken stick. I never had these parts, bought it broken with the car in 1978. Mike Stilwell
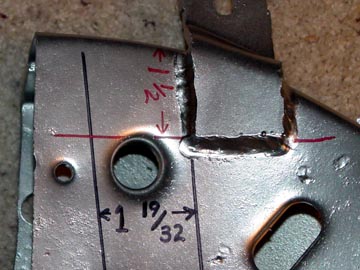
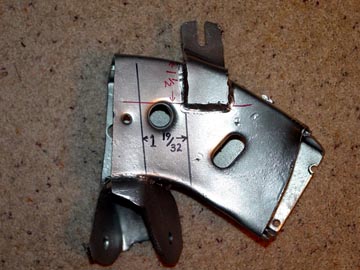
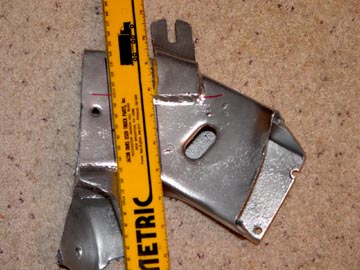
Z Bar Weld On Frame Mount Position:
To find the correct location of the Z Bar frame mount, lay a straight edge flat on the side of the frame and against the rear side of the lower control arm mount and draw or scribe a line. Then measure over 1 19/32" and draw a parallel line. This will give you the the left side location. Measure down from the top of the frame on that line 1 1/2" and draw a line from the top of the round punched hole thru your 1 1/2" mark. This will give you your bottom location. (The bottom mark is NOT at a 90 degree angle to the verticle side mark. BR[]
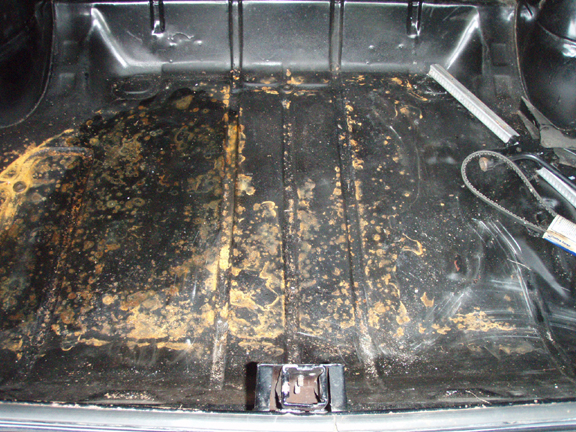
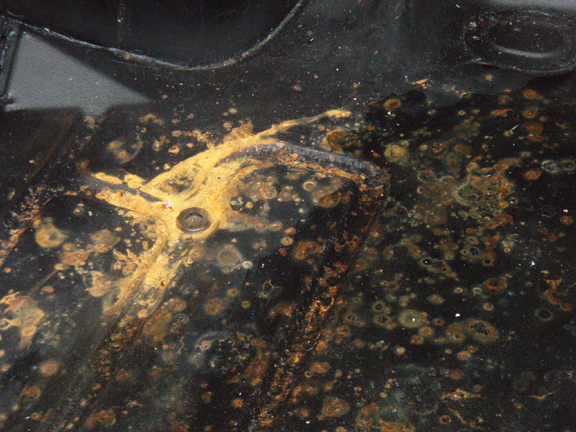
Correct Trunk Paint Color:
I am always being asked the question..... "Were the trunks painted the same color as the body or were they painted with the aqua and black splatter paint?" Although I personally prefere the splatter paint, the body color was the correct paint for all 442's. The aqua & black herringbone rubber mats that were used over the regular body color cause sweating and eventually a rusty trunk, and that's why I'll stay with the splatter paint. The pictures below show the sweating and what just one year under a rubber mat can do to a newly painted trunk.
Available from GM dealers is the GM Recondition Paint Black & Aqua 1#1051499 Gr. 8.800 that I use. BR[]
This is a tricky one. Oldsmobile created this funny clear maroon
paint (scarlet) that is hard to duplicate unless you have the paint code and
I have never been able to find the code. I have replicated it two ways.
1) Get some clear Maroon tint from the paint store and mix it with clear. I
use PPG Deltron and mixed it with DAU and DT reducer
2) Use Dykem Red machinst layout dye and spray it on (aerosol can) or carefully appy a couple coats (bottle) with a modeling brush. If you use the Dykem (ethanol based) it is not very durable so it is best mixed with Clear to keep it from fading or you will have to freshen it up every two years.
P.S. I thought I was the only one crazy enough to repaint Olds rockets but, the fact that you're here, just proved me wrong. Dave Lawrence
Front Fender / Wheel Well WARNING:
You've had a great paint job done and now it's time to put it back together. When installing the wheel wells, KEEP THIS IN MIND. When you buy a new front end bolt kit, the bolts are all the same size. The pointed bolt that goes at top dead center should be screwed in very carfully. If it is too long it will push the fender out causing it to crease. It is best to trial fit the bolt first and then grind it down. This is the case where shorter the better. I've seen this done several times and maybe just maybe may have done it myself. BR[]
Fremont PVC Valve Tip:
If you have a Fremont built car with the PCV valve in the left valve cover, make sure you use the factory type valve covers with the full length baffle. The after market valve covers have a short baffle and do not work. They allow oil to be drawn out the top of the valve cover and into the back of the carburator. This information was learned the hard way. Glenn Howard
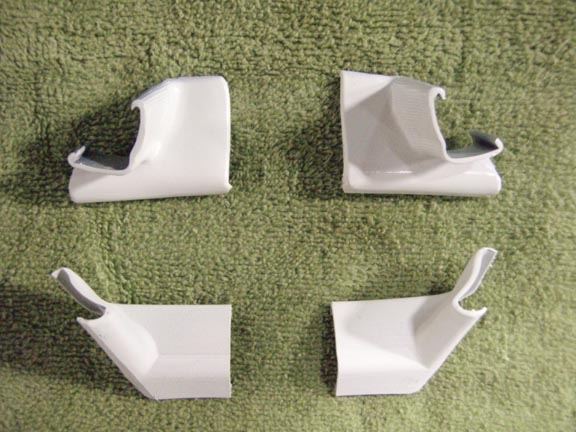
Rear Window Trim & Windlace Problems:
If you have ever tried to install the after market (Trim Parts) rear window trim, you know that #1 It is not the same as the original #2 neither are the corners (much smaller and the bottoms are completely different) #3 the side pieces are 15 3/4" and should be 18" long. I am getting sick and tired of the suppliers listing many Olds parts that are actually Chevelle, Pontiac or Buick. They are neither the correct pattern, length or design for our cars. They may fit, but that's all. The same goes for windlace. Most suppliers offer the windlace for the 65 which is flat and totally incorrect. The actual windlace is about 1/2" square. They also sell, what they claim to be a complete kit, for the Sport Coupe, that does't supply enough for the piece that runs vertically behind the door. Tip: You can use your old top piece, or buy an extra new one, to make longer sides
Fusick's p/n IWT645is correct for our cars. BR[]
Original Corners Are Much Wider
Aftermarket Corners Are Much Smaller
The Pattern And Width Are Different
Black Console Base Paint :
SEM Landau black.
Tail pipe Alignment:
F-85 4-4-2 Model Only ----- 1965
CONDITION: The tail pipes on the 4-4-2 may be positioned too high or too low in relation to the rear bumper. The pipes are desiged to be 1/2" below the bottom edge of the bumper.
CORRECTION: Check the rear hanger to be sure it is not twisted. If necessarry, loosen the hanger and straighten. If the pipe is still misspositioned, loosen the rear hanger and the hanger at the rear of the muffler. Then swing the kick-up in the tail pipe right or left to obtain the 1/2" dimension required. Oldsmobile Service Guild Training Manual
Mini (gear reduction) Starters that work:
The listed starters have been used by other 65 owners who say they work on the 400.
1. PowerMaster # 9510 it's listed for Pontiac, but fits the 65.
2. RobbMC # 2004
Seat Belt Retractor Replacement:
Have you ever wanted to replace your worn seat belts, but couldn't figure out how to get the chrome catch through the plastic cover with out breaking it. The answer is, you don't. You actually work from the retractor end. I have detailed the process on my Seat belt page.
Boxed Lower Control Arm Warning:
Are you aware that quite a few, if not most '65 442's had control arms that were not boxed all the way across the bottom? (From front to back). The boxing stopped just after the the bolt for the control arm. Problem was that it created a highly stressed area right where the boxing plates stopped, and at first, cracks would form and then the arms would literally start to split in two. Olds apparently found this weakness pretty quick, as they are all fully boxed on the '66 models. Anyone with these partially boxed arms should change them asap, as it is risky not to!!! Mine were more than 50% split when I discovered it! (about 20 years ago). I kept them just for reference. Kurt Shubert
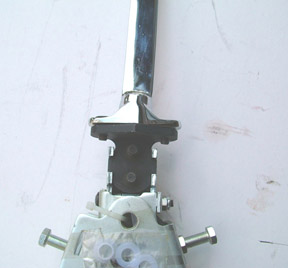
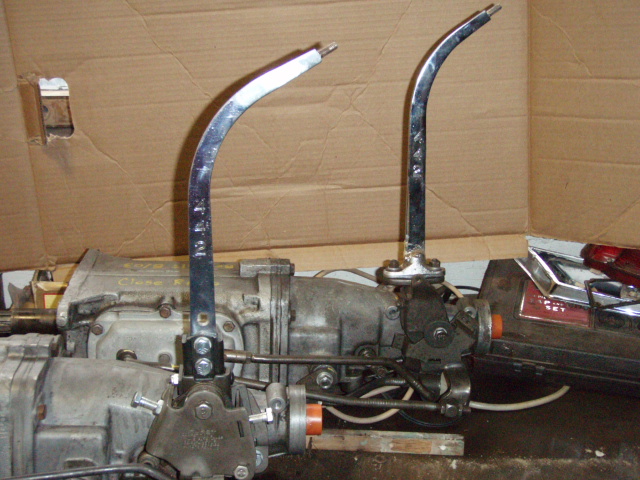
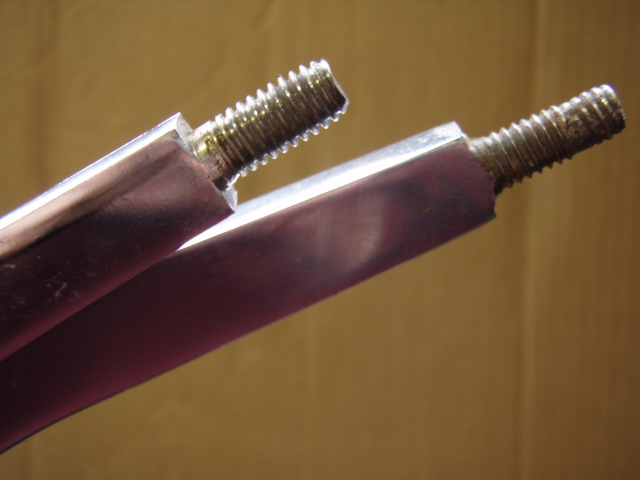
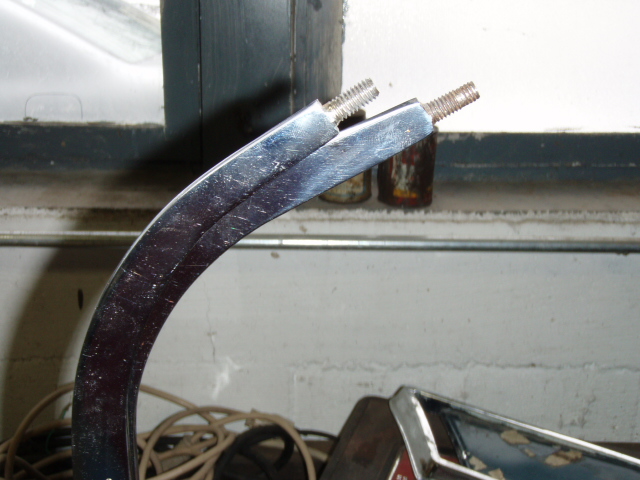
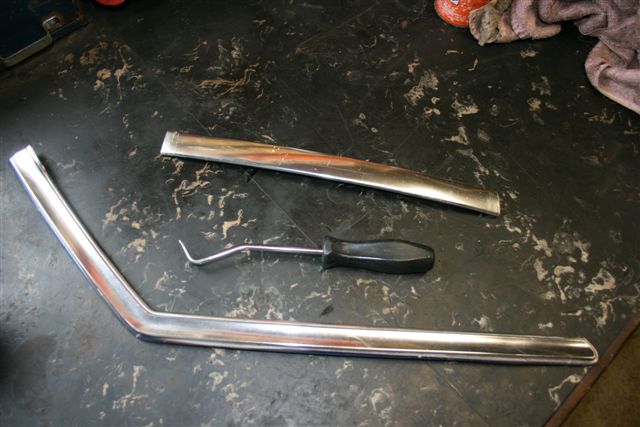
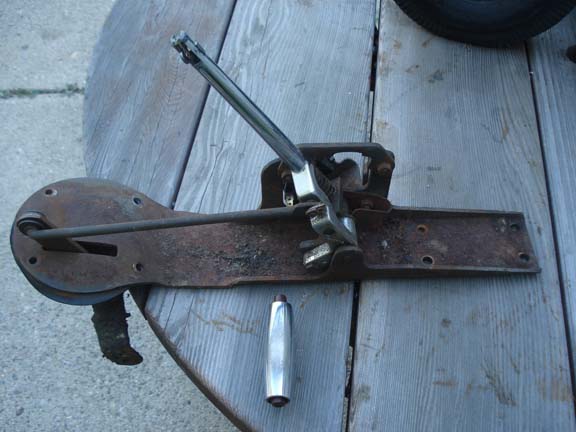
65 442 Shifter Variations:
After stacking several shifter handles together, I noticed, for the first time, that there are differences in the bucket seat versions, with the arc and the length. The first picture shows that the shifter on the left has a steeper arc and is about 2" longer than the one on the right. BR[]
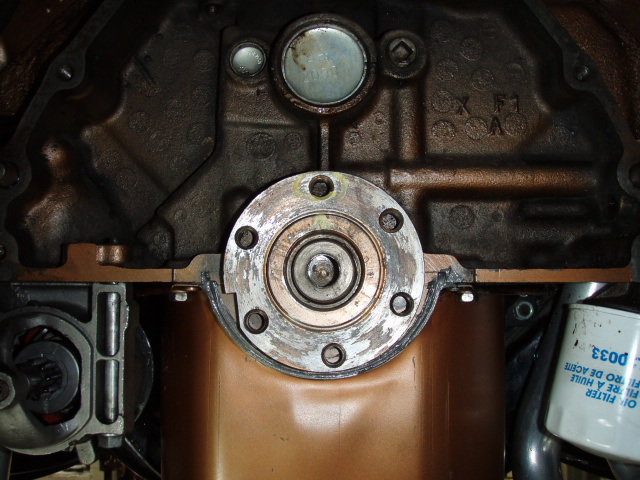
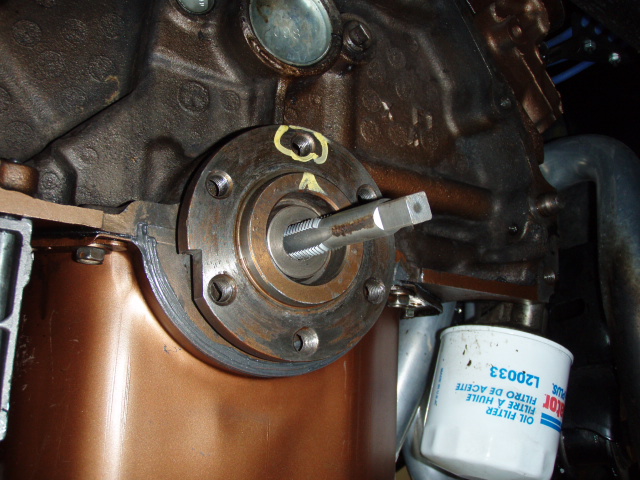
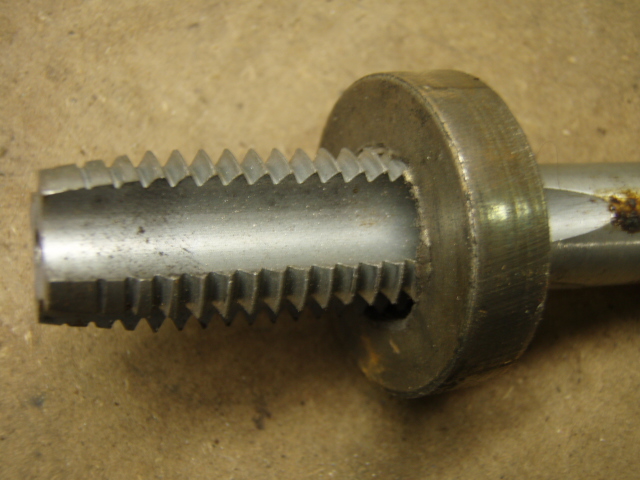
Pilot Bushing Removal:
Here's a tip that will make the removal of the pilot bushing a simple process. All you have to do is take a tap ( usually a 5/8 ) and tap it through the bushing until it makes contact with the drive shaft. Simply keep turning the tap and it will push the bushing out with very little effort. ( If the bushing is badly worn, use a larger tap )
This sure beats the heck out of the "pack it with grease and drive a dowel in the center method" and a lot less messy. BR[]
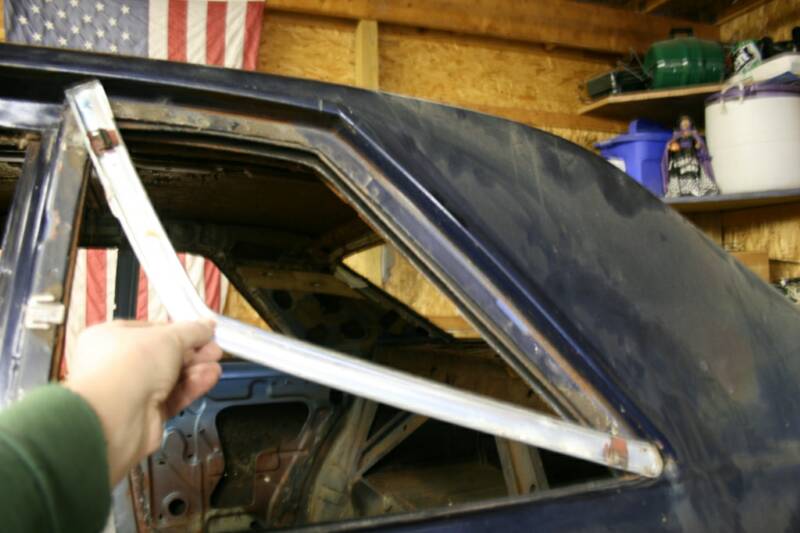
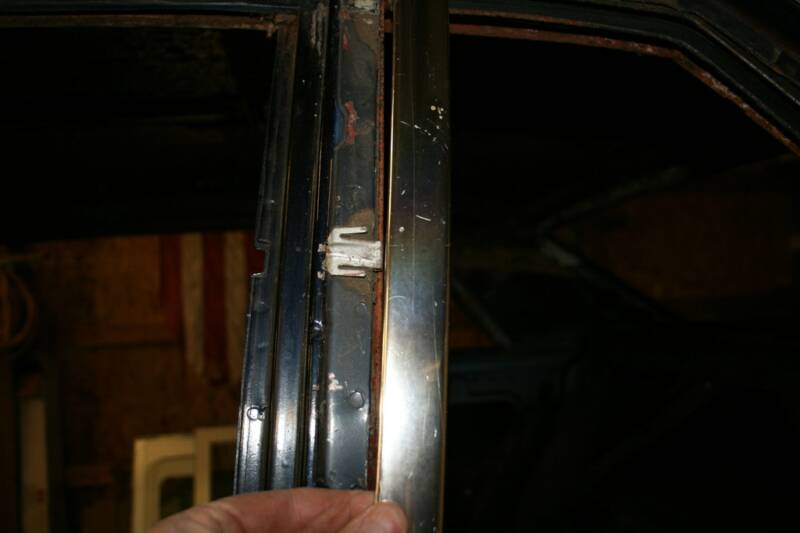
Sport Coupe Door & Side Window Chrome Removal:
This is my way of getting the aluminum trim off. I used a tool that is used for loosening radiator hoses. ( This first picture shows the tool ) First I determined the location of the retainer clips. Then start at the bottom of the vertical piece. By working the tool you can get the clip to leave the aluminum piece by prying at that clip with pressure toward the back of the car. You do the same thing with the second clip be cautious, just get it past the second clip then push downward to slide the trim piece out. Now for the top piece. As seen in the pictures, the clips is about 2 to 3 inchs from the end. Using the same tool, pry down around this area. Once you get it out you pull upward to slid the clip off. Thats it. Mike Barense
AUTOMATIC T HANDLES::
I've done a great deal of research on these handles, and I have seen many come and go. I know they run from 64 thru 66, but I believe that were installed in 67's as well. Here is some advice.
First of all, these things break like a twig. Many folks have them and bought their car with a broken shifter and have never seen one that was NOT broken. Many folks think the "T" part is what broke, and that's why they have just a stick with a small roller on top to push down on to release the detent. Not correct. The "ears" on the stick is what broke so the "T" has nothing to connect to.
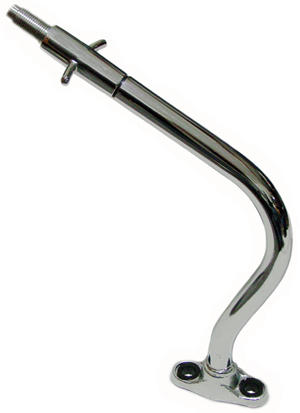
A good stick has ears that stick up and have holes drilled into each side so that a roll pin can be pushed in through the "T" handle into the stick to hold the "T" on the stick. These parts are made out of very cheap pot
Rear End Housing Info & Interchange Data:
From 1964 thru 1967, GM A-body rearend dimensions measure 56.5 inches, from flange to flange. With the drums in place it measures 60.5 inches. The dimensions are similar to the 1967 thru 1969 Camaro, Firebird, and also 1968 Thru 1974 X-cars and clones, except they used leaf springs. 1968 thru 1972 rearend housings are 58.5 inches from flange to flange, and 62.5 inches with the brake drums in place. These are similar to the 1970 thru 1981 Camaro, Firebird, and 1975 thru 1979 X-cars and clones, except they used leaf springs.
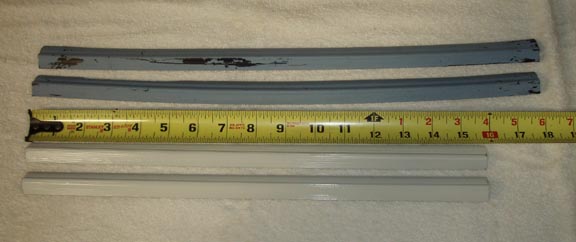
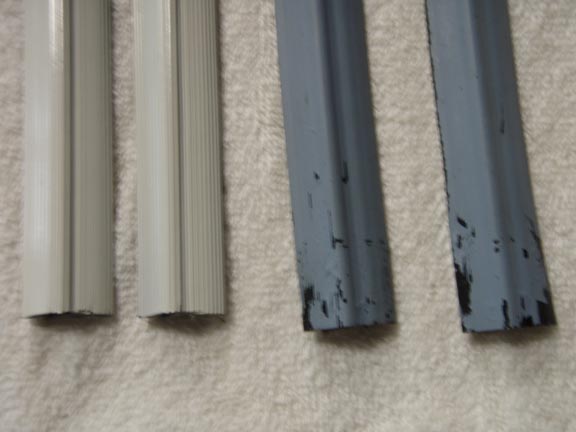
Removing the drip rail:
Why can't we find decent drip rails on parts cars? It's because, for some reason that totaly escapes me, people try to take them off with pliers. If you really don't care what they are going to look like when you're done, why take them off in the first place? What good are the pieces on the right? NONE !
I have found the the best way, or at least what works for me, is to cut a paint stick into 4" pieces and very carefully using a small hammer, starting at the rear and working from inside the car, gently start tapping the lower edge and work ahead 4 to 6 inches and then start at the back again. Be patient not trying to get too much movement too fast. It will begin to release and become easier as you work your way to the front. When you get to the front curve, go gently because the whole rail will pop off and we sure don't want to drop it and dent it after working so hard not to damage the darn thing.
Tip: 65 Chevelle drip rails are the same as Cutlass.
Motor Mounts & Mounting Pad Selections:
The question of which motor mounts to use when replacing an A-Body (F-85, Cutlass, 442) small block with a big block is one question that's asked all the time.
All Olds engines (big and small block) have the motor mount bosses in the same location in relation to the crank centerline. The only difference is the deck height. The year of the block, or the displacement for that matter, has absolutely NO effect on the type of motor mount to use. The only thing that matters is the matching frame mount. You must use the motor mount that matches the frame mount in the car.
If it was orignally a small block car and you do not intend to change the frame mounts, get small block motor mounts. These will bolt to the big block and will allow the engine to sit in the exact same location relative to the frame as it would have in a factory installation. Alternatively you could use matching big block motor and frame mounts, but for all this extra expense and effort the engine will still be sitting in the same location.
Small block engine mounts with small block frame mounts - OK
Big block engine mounts with big block frame mounts - OK
Small block engine mounts with big block frame mounts - the engine will be 1-2" too low
Big block engine mounts with small block frame mounts - the engine will be 1-2" too high
Note: The big block is about an inch taller than the small block when measuring from the crank centerline to the carb flange, so even if you use matching mounts, the air cleaner and valve covers will be higher in the engine compartment. The crank centerline, fan, and flywheel will all be in the same location as they were with the small block.
"The only thing you need to remember is that the rubber motor mounts and the metal frame mounts need to match. Nothing else matters"
The 64-69 small block and 65-68 big block motor mounts are identical. The 1969 400 mounts (and 455 for the 69 H/O) were changed to the taller design used on the 69-72 cars. The small block mounts were changed in 1970. Sealed Power 270-2261 - 1964-69 all V8 exc. 69 w/400
History
1964 - 1968 small and big block motor mounts 270-2261
1969 - 1972 small block motor mounts 270-2261
1969 - 1972 big block motor mounts 270-2328
1973 - up small and big block motor mounts 270-2380
The problem started in 1969. The original motor mounts used on the earlier cars were simply two pieces of metal with rubber molded in between - there was no interlocking feature. GM went through a massive recall in the 60s to repair broken motor mounts of this design. As a result, the big block cars, starting in 1969, got the interlocking design. Unfortunately, this design required the motor mount to be taller, so the frame mount was changed to move the cross bolt (the bolt that attaches the motor mount to the frame mount) further down on the frame mount. The 64-68 (and 69 small block) frame mounts have the cross bolt hole about 1 1/2" down from the centerline of the two top bolts that attach the frame mount to the crossmember. On the 69-72 big block mounts, this dimension is about 2 1/4". The rubber motor mounts are correspondingly different (the 69-72 big block motor mount is about 1" taller than the 64-68 V8 (and 69 small block) mounts.
In 1970, Olds redesigned the small block mounts to also incorporate the interlocking feature, but did this in a way that did not require the cross bolt to be moved. Thus the 70-72 small block frame mounts still use the 1 1/2" dimension. There is, however, a difference between the 70-72 small block mounts and the 64-68 V8 (and 69 small block) frame mounts. The raised pad is smaller and biased towards the top of the mount. Thus, I do not think it is possible to use the 70-72 small block motor mounts on the 64-68 frame pads. On the other hand, it probably _is_ possible to use the 68-68 V8 (and 69 small block) mounts on the 70-72 frame mounts.
Finally, starting in 73 Olds realized that there was no reason to maintain two different motor mount designs and went back to using a common motor and frame mount design on both big and small blocks.
And one more word of advice. Don't rely on any catalog, other than the factory parts catalog, to tell you what motor mounts fit where. As I noted in a prior post, the Sealed Power catalog is flat wrong.
Identifying Frame Pads:
You can check by measuring from the center of the two top bolts that hold the mount to the frame to the center of the cross bolt that attaches the frame mount to the motor mount. The big block frame mounts will measure about 2 1/4", while small block mounts will measure about 1 1/2". Whichever ones you have (big or small block), get the motor mounts to match.
When bolting the motor mounts to the block, there are three tapped holes on each side. The front two are for full size cars, the back two for F-85's.
The 1970-earlier B/C body cars use a motor mount that is completely different from the A-body mounts. The rubber mount has a threaded stud that fits into a hole in the frame. A nut is installed from the underside. One other wrinkle is that some B/C body cars DO use a 1" shim under one motor mount (see notes on the Cutlass offset engine myth.) If the shim is there on the 350, use it in the same place on the 455. Also, note that B/C body motor mounts bolt to the forward two of the three bosses on each side of the block. The A-body cars use the rear two bosses.
Q) Are the 69 onward small block motor and frame mounts exactly the same as the early "one size fits all V8's" units.
A) The answer unfortunately is no. The 69-up small block mounts are not the same as the 68-down universal mounts. The net combination of matched motor and frame mounts for a specific year is always the same, but the individual parts may be different from year-to-year.
Q) What is the earliest year motor and frame mounts that will put a V8 into an A-Body?
A) 1964 330 motor and frame mounts used as a matched set will install any 64-up (except, of course, the 394) Olds V8 in a 64 A-body. Ditto for 65, 66, etc.
Q) Are there any better quality mounts or mounts to avoid?
A) General concensus is that the G.M. rubber mounts (made in the U.S.A.) are the best rubber ones. Also, for reference, the Mondello SM300 mounts appear to be solid versions of the Sealed Power 270-2261 mounts and SM400's appear to be the solid version of the 270-2328.
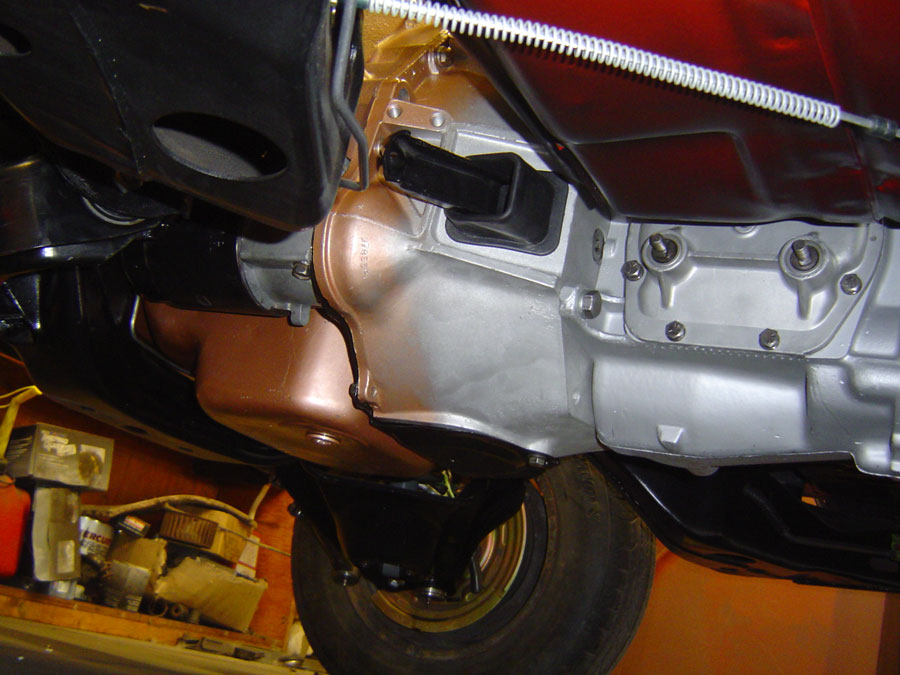
There is alot of misconception about how original equipment Olds engines were painted. One thing you can say about Lansing and the people who built Oldsmobiles is that they devised excellent systems for building cars and for the most part stuck to the regimen or procedure. So there isn't really a lot of variance in the way engines were painted prior to installation. The trick is learning just what procedure they used. I do know based on the evidence I have and the employees I've talked to that the engines were fully assembled but not "dressed" when they were painted. What I mean by that is, that the engine had assembled to it, all the necessary components for the type of assembly it was to be except for those components that were determined by option. Components determined by option were installed at final dress which came after final assembly and test run. The components you'll find on a pre-dressed final assembly would be the exhaust manifolds and bolt locks, the distributor housing and hold down (without cap), wires and spark plugs, the fuel pump and fuel lines, water pumps and pulleys, complete starter and wiring harness, filler tube and cap (pre'68), water outlet and coolant bypass hose and clamps, nipple cap and clamp (heater delete), oil filter and mount, cast alternator bracket (standard), bellhousing (sychomesh jobs)or flex plate (automatic jobs), valve covers, bolts and brackets sans grommets and crank dampner sans pulley. There were no carbs installed until final dress. Cap, plugs and wires were installed prior to test run but before dress. This procedure was not ideal but worked for the majority of engine builds. There were always retrofits or conversions that more than likely had to be dealt with at final dress (ie chrome valve covers on W30's with unpainted cad plated screws, air conditioning and heavy-duty cooling.). If one studies how the engines were painted you can see that engine color was applied fairly evenly but there were light areas where paint was to be avoided. Those areas to avoid would have been the exhaust manifolds, main housing of the fuel pump and starter. Running the paint was common too. I'm sure the engine painter had seconds to paint each engine as the line dept moving and that is after he decided what color he had to choose first! So basically there is little or no paint behind these components. If any Olds line employees can correct me or fill in any gaps please do so. Now that you have got your engine painted that nice bronze color then you install it in your chassis with the running gear then send the whole chassis assembly into the "black out" booth where all those nice NOS components get a hit or miss coating of running, glossy, gooey asphalt based rust preventative which usually coated all or part of the bottom of the motor. Yes, most engines were two tone.Color on top and black over color on bottom. I matched my olds engine color to some paint charts and was happy with the results. It's alot of personal preference when picking a suitable bronze to use. There are alot of bronzes out there. All '67 engine enamels were 0 degree gloss or flat.
NOTE: Add one thing, the oil filter was installed and would have some over spray on it, as would the other items you mentioned like, the starter. You are also right about the consistency of how things were done by line workers and management in seeing that the cars built in Lansing were built more "By the Book". This is evidenced by the warranty submissions by dealers for adjustments, repairs, etc. from other assembly plants as compared to the Lansing plant. I know, I saw the product reliability stats and Lansing usually was 1/2 the charge backs than other plants! Even though there was always the union (UAW) verses management tension thing , there was a lot of pride in the work place at the Lansing Assembly Plant. As I was exposed to upper level management both in the Service Dept. and Engineering I can say first hand there was extreme product loyalty. I just don’t buy that so many mistakes were made when all these people on this site claim this special part came on his/her car. Ya mistake were made but cost were keep so close as the profit margin was so close on GM cars. That’s why olds had so many inspectors at each assembly station not only for quality control but for Cost Control. If the wrong part was put on the cost factor for that item went out of site to correct the installation or that the part cost was not figured in to the actual cost.
The manifolds were not installed when the engine was painted (at least from 68-73 when I worked there). A shield was held in place briefly over the exhaust ports when that area was sprayed. I did see some very light over spray of engine color at the edges of the frt. edge of the frt. exhaust port surface and at the rear edge of the rear port. When the engine was fully dressed after painting is when the manifolds would be installed. I am sure this light over spray burned off when the engine was run in at the engine test station. I never saw a fully dressed engine ready for the engine test area with engine color on pulleys, brkts., exhaust manifolds, (alumn. intakes for w-cars in 70'), carbs, ignition wires and dist. caps, fuel lines, etc. However, I do know the dist housing was installed at the time of painting and could have some over spray on it. This is evidence by the fact that I do have some small and big block dist. with some engine color on them at the base of the dist housing. You will also find that the engine painter sprayed very little amounts of engine color at the rear of the engine, especially in the bell housing area, why I do not know. I think they cut corners because of the amount of time they were allowed to apply the material. Inspectors in the engine paint station would not have allowed sparse painting to been done in other areas of the engine as the rear of the engine was somewhat out of view, tucked up and under the firewall. Remember the engines were also on an assembly line in the engine plant that moved at a certain, constant speed! Only the W-car engines were treated differently, as the engine was painted without some items not installed, like the intake and they where on individual assembly carts and not part of the moving regular engine assembly line.
In response to Brian, yes the 70 engine assembly manual does show the engine assembled with the exhaust manifolds with no specified exceptions about the manifolds. One would assume that that would be the way they went through the paint line. Dave says he doesn't remember seeing the manifolds on the engines prior to painting. I have not researched any low mileage '68-'73 jobs nor do I have an factory photos myself indicating what the assembly status might have been. So I can't give you a definite answer. I can say that even in the case of '64-'67's that it does not appear that the manifolds were to be specifically painted and even if they did receive some paint it was acceptable as it would burn off relatively quickly in the first few minutes or hours of operation. It's entirely possible that Olds didn't like the lack of coverage the assembled manifolds might have caused so they decided to delete them for painting or for some other reason. I believe that Olds did some type of masking/shielding on the early V-8's to keep paint off the manifolds. So going with a natural finish to your manifolds would be the logically way to restore them in my opinion. Curt Anderson
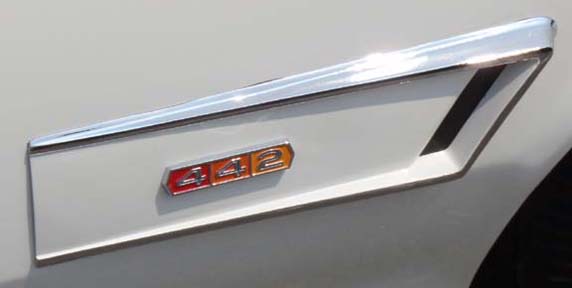
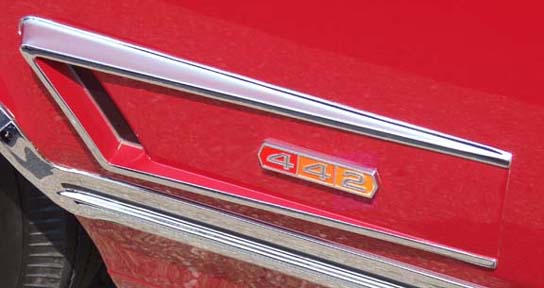
Correct Side Scoop Paint Detail:
Both of the examples show the correct paint detail. Notice that the inner side of the main edge and the flat panel are painted body color. Not just the flat panel which the 442 emblem mounts to. All scoop had the aluminum inserts, painted flat black in the center.
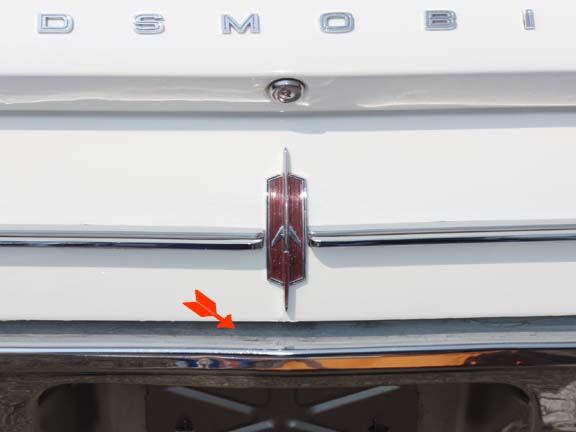
Tail Panel Painting Tip:
If and when you decide to paint your 65, keep this in mind. The bumper is an excellent mirror. You can see what I mean in the picture.
1. Make sure your bodyman takes the time to finish under the tail panel where it rolls in over the bumper.
2. Next make sure the painter (if different from the bodyman) understands as well. BR[]
Sooner or Later
You'll Find Yourself Here.
I hope the following tips will help you thru your project. If you have a good tip you'd like to share, let me know.
I'm not gettin' much help here..... Get off your butt or out from under your car and send me a tip or two.
Paint Tips
Body Ground:
The body ground location Is the copper braided strap from the head to the firewall. It grounds the body to the electrical system. The negative cable goes to engine block where the ground strap transfers the ground to body. It serves other purposes also. A few things to remember, never replace with single, or multiple strand, insulated wire. ALWAYS use BRAIDED non insulated material, COPPER. The reason for the braided is that it is a superior R/F dampener, it tolerates vibration, heat, and stress much better than single or multiple strand. This strap not only grounds your body accessories, but turns your sheetmetal in to an R/F shield. Your alternator, ignition, blower motor all try and screw with your radio, this is designed to damper this.
You`ll notice often this connection is burnt, or severed,it`s usually from a bad main ground to the block, or block to frame.
I'm still looking
Textured Argent Silver available from Totally Auto Inc. 215-322-2277 does a good job of recreating the textured look on the back panel. Mathew Moriarity The originals were a chrome process, not painted, but this looks very close. BR[]
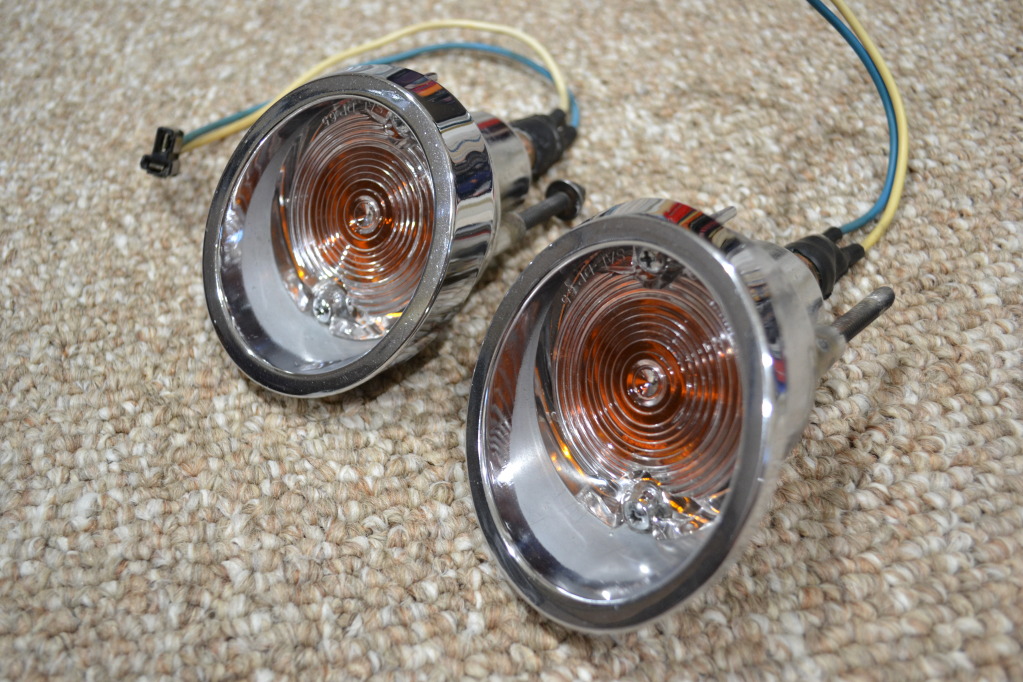
Parking Light Lenses:
The new parking light lenses are not exactly the same as the originals on the inside. They do fit the housing correctly, but the inside is different. There is a ledge on the inside where the plastic amber insert fits that is incorrect. This creates a loose fit causing the insert to rattle around. It can be held in place with a few dabs of clear silicon or any other adhesive.
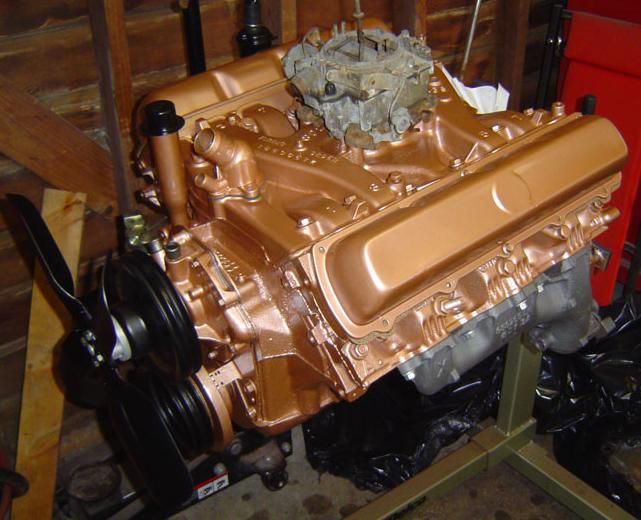
Engine Painting:
The engines in the 65 442 were painted Bronze only. The engine was painted after assembly, as complete units, less the brackets, pulleys, fan, power steering pump, air conditioner pump (if equipped), and other accessories, which were installed after the paint was applied.
They were painted assembled, complete with heads, intake manifold, water pump, valve covers, and oil pan in place. The distributor, thermostat by pass hose and manual bell housing were also mounted and received some overspray in the process.
BR[]
Best Matches:
Plasti-Kote color FM8069
Krylon AP-31 (if you can find it)
Rustoleum (High Heat) Aged Copper
Dupli-Color DGM 286 Camel (my Choice)
First let me say, I have nothing against any of the suppliers listed to the right. They all supply us with great parts for our 442's. I simply don't think any of their colors are correct for the 65 thru 69 442 400 engine. The Bill Hirsch paint color looks the closest until I sprayed it on my L-69 manifold. It just aint right. The Supercars Unlimited is not even in the ballpark and the Fusick is too much to the red copper side. The colors that appear on this web page match perfectly with my test samples. Any help you can offer is always appreciated. BR[]
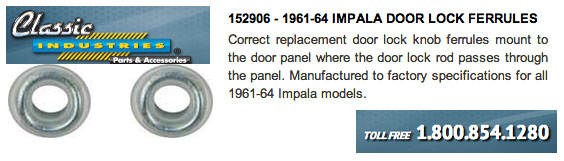
Door Lock Ferrules:
The door lock ferrules sold for the Olds "ARE NOT CORRECT". These
61 thru 64 Impala ferrules are exactly the same as our originals.
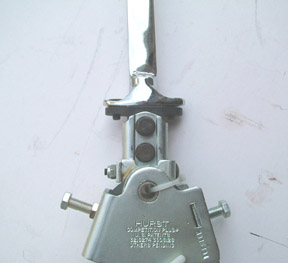
Converting from a Saginaw to a HURST Competition Plus Shifter:
You can get rid of that sloppy Saginaw and install a new Hurst Competition Plus Shifter and still keep the original shifter handle.
1. Get the new shifter and linkages for the 65 442.
2. Remove the Hurst handle from the gate.
3. Replace handle with the adapter (Muncie handle to Hurst shifter)
a) part # 20004-1) Available at Chevy2only.com 502-239-8487or b) part #7210H689 from Auto Krafters Inc, Broadway VA. 800-228-7346. (this adapter offsets the shifter to one side)
4. Bolt your 442 shifter to the adapter. That's it!
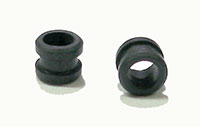
65 Muncie Shifters: At best, not so hot. I have the same shifter in my Jetstar 1. There are 2 rubber gromets that go on the studs where the handle attaches to the shifter. I found a Chevy supplier in Calif that has them. I replaced them on my JS1 and I was almost amazed at how much that improved things. So to anyone keeping the Muncie shifters, I'd say replacing those gromets is a must! Kurt Shubert
Alternator Bracket Difference:
The 65 had a one year only alternator bracket, which was made up of 2 pieces. The 66 and up had 3 pieces. (66-72ish)